Put to the Test: Free Game Engines for Schools

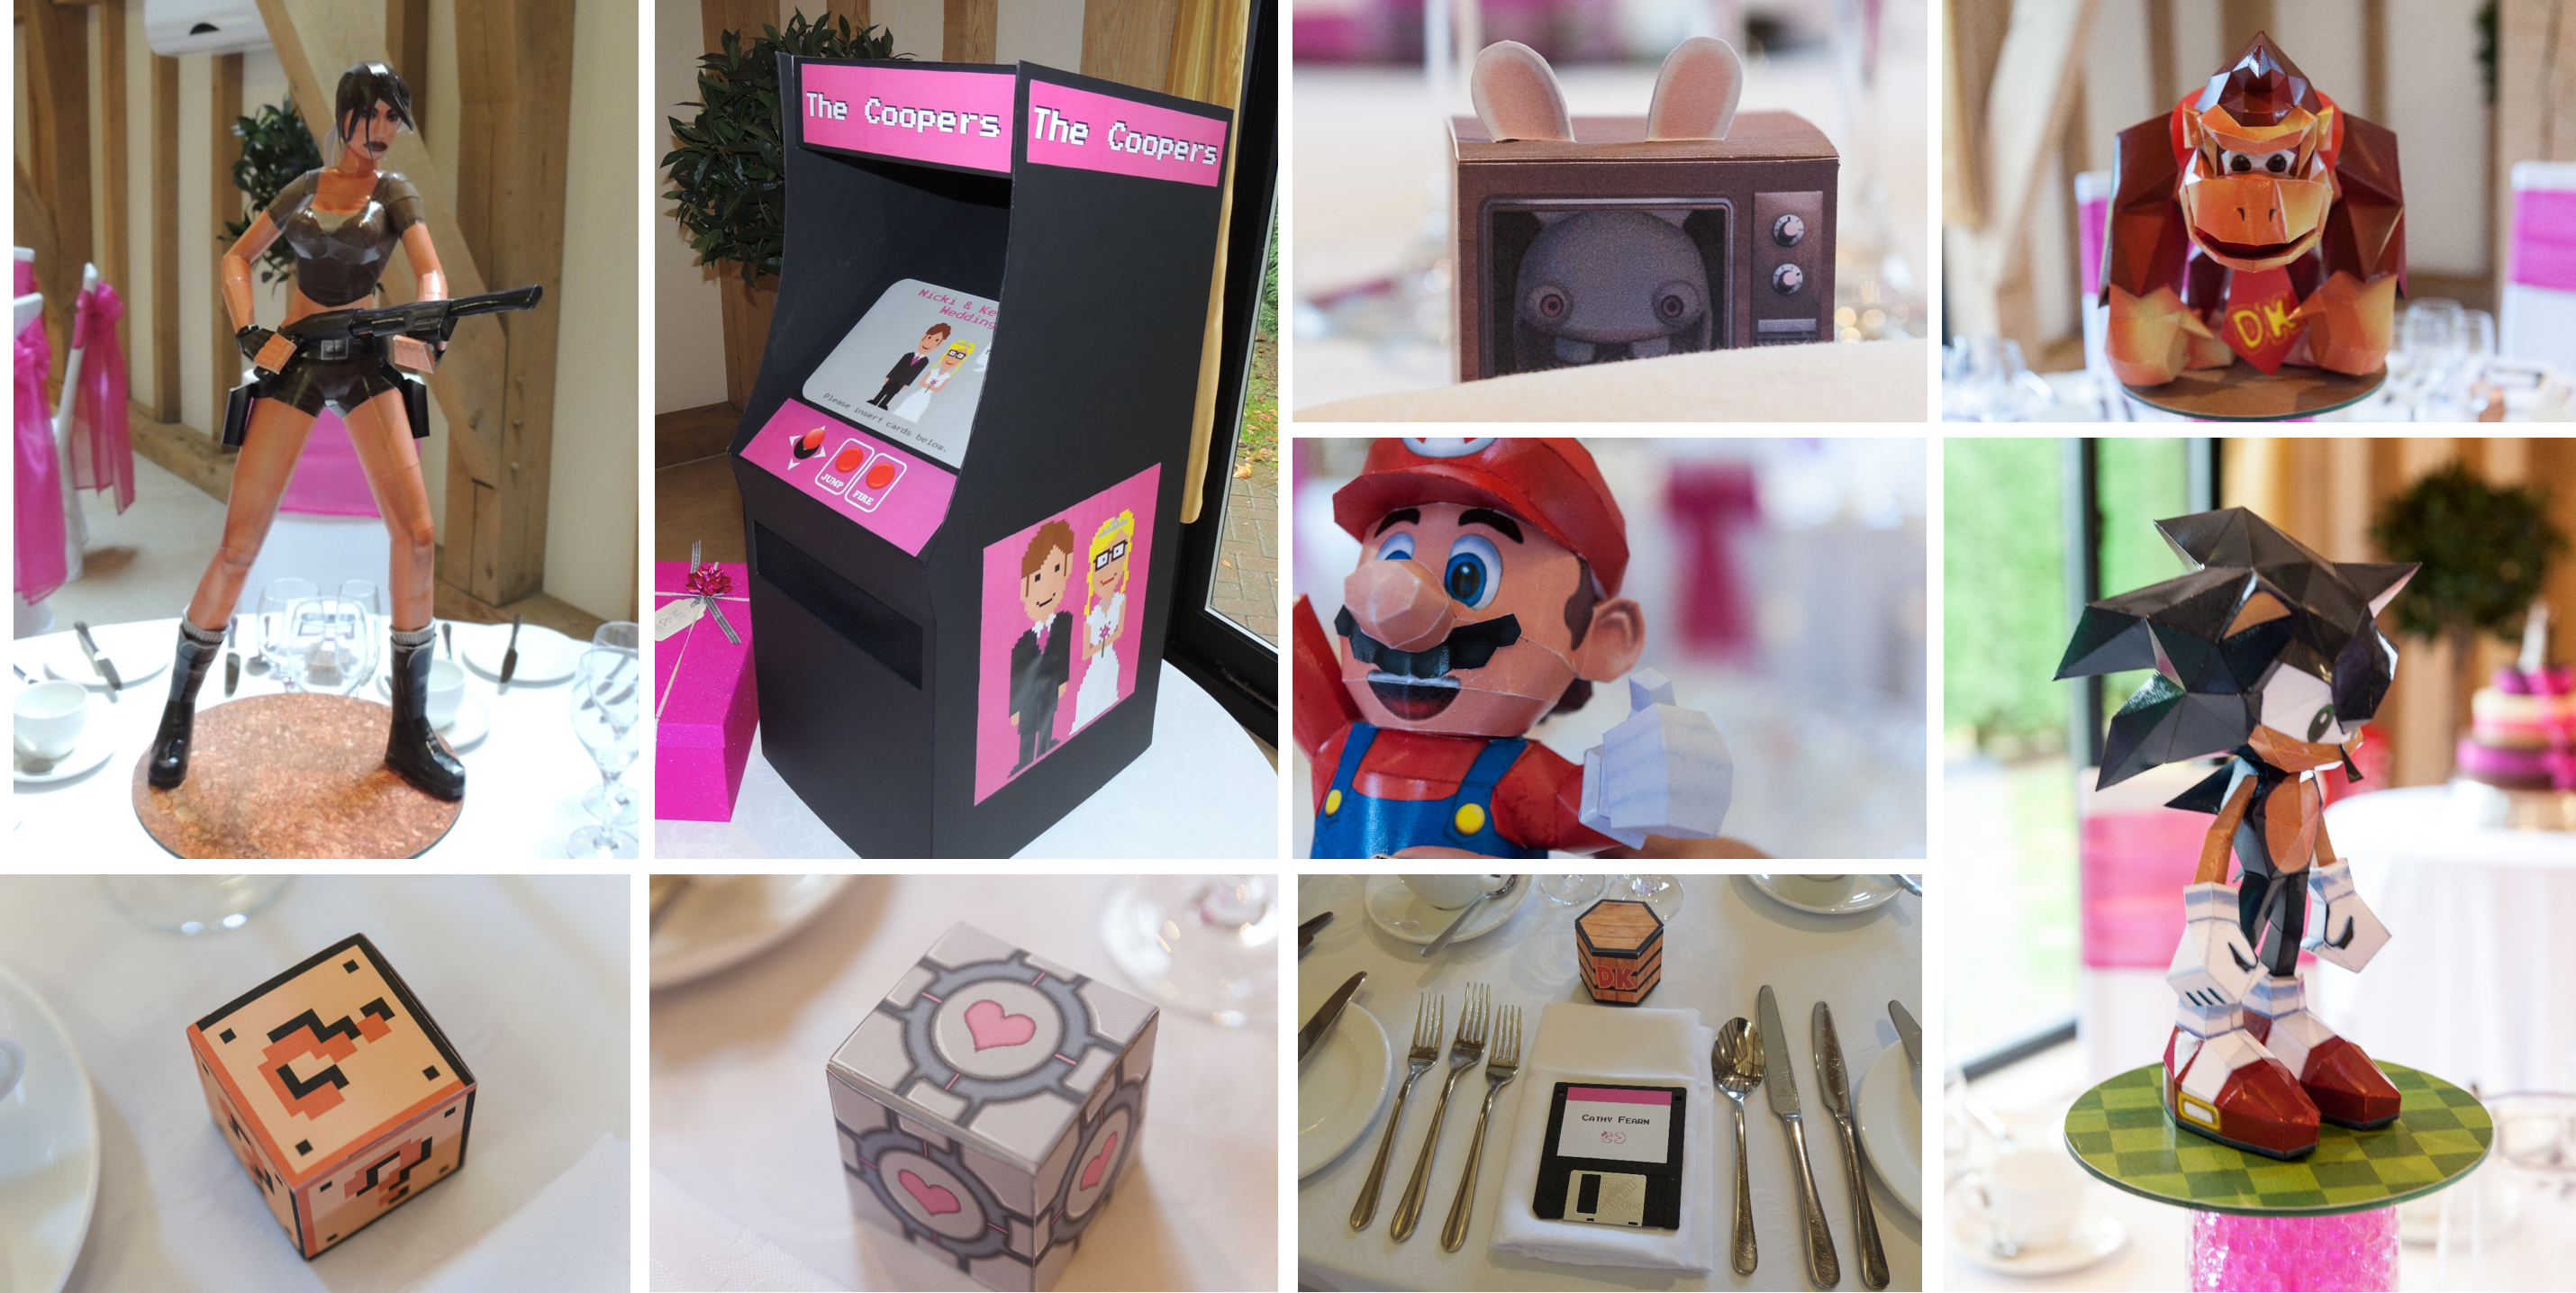
If you’ve followed my blog for a while you will know that I’m passionate about introducing children to the world of game creation! I’ve always enjoyed playing video games (it was even a theme at my wedding!). Scratch was released shortly after I started teaching and from the moment I discovered it, I knew this was a great way to engage children with coding when previously the most exciting thing they did was controlling a traffic light sequence in Flowol! 20 years later, Scratch still remains my firm favourite and I don’t think it can be beaten for getting children started with learning the fundamentals of coding and Scratch Junior is a great solution for KS1. None of my recommendations in this post are designed to replace Scratch, they are more of a next step, focussed specifically around game creation.

Children love playing games, nine out of ten young people aged between 3 and 17 play videogames in some form or another, so once children are competent with basic coding techniques they may be keen to develop their own games, especially as the UK is the largest videogame market in Europe. There are lots of great tools on the market and that is what this blog post is all about! Game engines, are tools specifically developed for creating games, handling things like the controls, collisions and physics to enable the user to focus on creativity! My original favourite, as you may already know, is Kodu! A fantastic tool for creating your own 3D games and worlds that are playable with an Xbox controller, unfortunately this is only available as a download on Windows PCs so not suitable for all schools and is no longer developed by Microsoft. If you do wish to use Kodu, I have a free scheme of work and teaching resources you’re welcome to use! After learning about a current popular game engine in schools, Construct 3, at a conference recently I thought it would be a good idea to put a range of game engines to the test and see which ones would be best for the classroom! This turned into a bit of a rabbit-hole and could have gone on forever, so to simplify things for this post I have only explored free options that can run in the web browser for maximum compatibility across different settings and devices.

If you want the TLDR summary of this post, my key recommendations are as follows:

Key Stage 2

MakeCode Arcade is the obvious choice at Key Stage 2, it’s a straightforward transition from Scratch with a similar interface but with the inclusion of key components set up and ready to use for making games, as well as a range of built-in tutorials. If you have an enthusiastic group of game developers and want to move their skills onto the next level you may also wish to consider Contruct 3 in clubs or for enthusiastic individuals.

Key Stage 3

Construct 3 would be my choice at Key Stage 3, it was a VERY close call between GDevelop and Construct 3 but Construct 3 prevailed overall due to there being no limit to the number of cloud projects you can have with the free version.

Key Stage 4

Contruct 3 would still be a great choice at Key Stage 4 as you can use JavaScript and TypeScript coding within your projects as an addition to the event sheet. If your students are looking to really extend their game development skills with the potential of releasing games across multiple platforms they may also wish to investigate Godot.

Key Stage 5

For Key Stage 5 learners, Godot is a powerful, open-source game engine with lots of online tutorials available, it’s ideal for budding, future game developers who want to push their skills.

Honourable mention

If you’re looking to develop a 3D game or environment with lots of built-in assets check out Struct Studio which is suitable from UKS2 onwards.

Browser-based Game Engine Comparison

I’ve put together a comparison table below for easy reference and making comparisons. I tried out the web version of each of the tools but many of them also have an offline version available as well so I’ve included that as an option in the table below.

GAME ENGINELEVELCODING TYPETUTORIAL AVAILABILITYOFFLINE USE?ASSET AVAILABILITYGAME TYPEEXPORTABILITY
MakeCode ArcadeKS2 KS3Visual – block basedLots of built-in tutorialsYesBuilt in assets or create your own within software – no import option2DNo
Can run on handheld devices and browser based emulator – embed into website with embed code
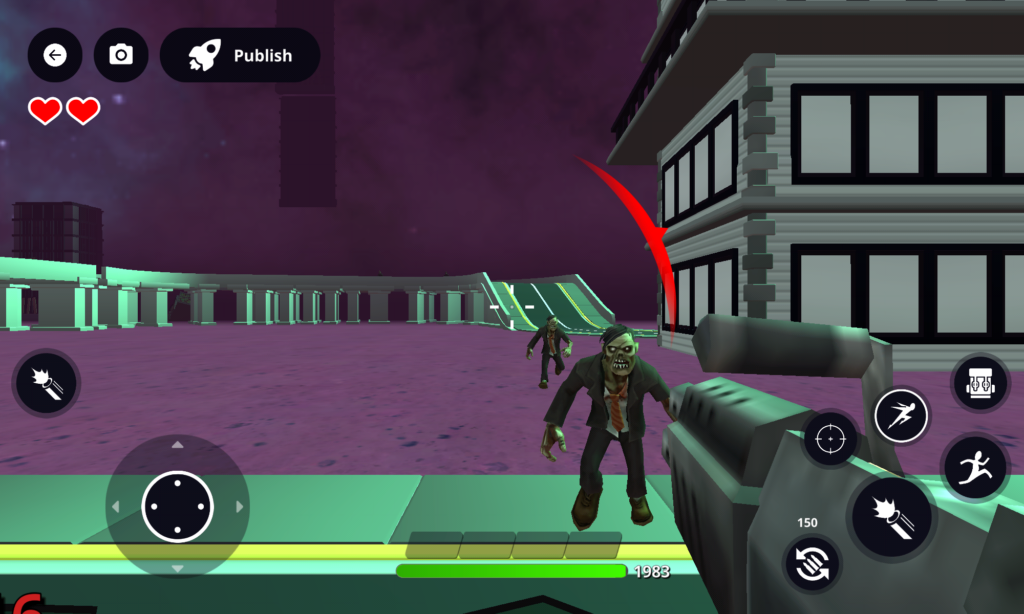
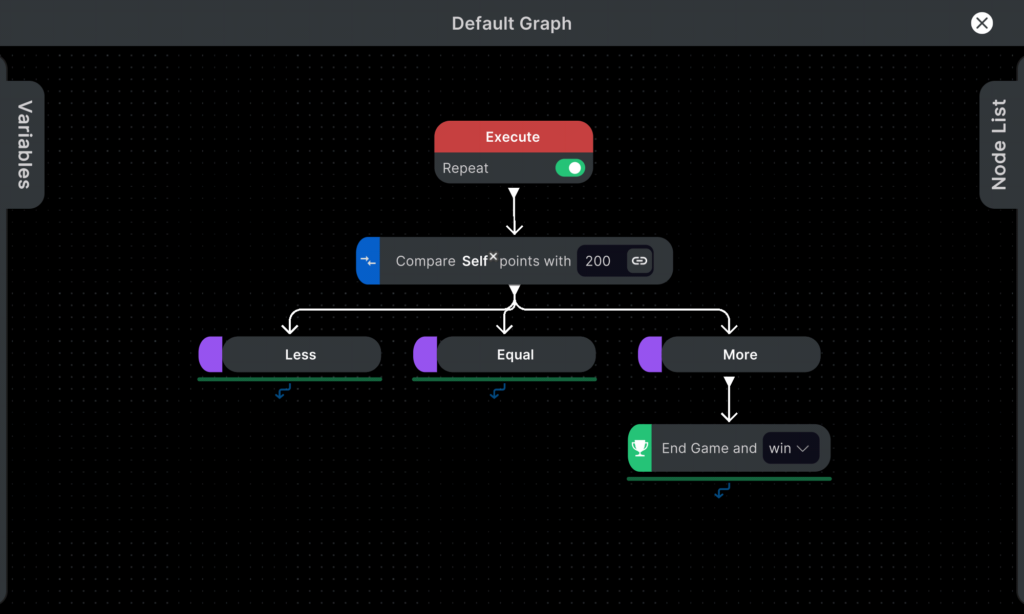
Struckd StudioKS2 KS3Visual – node/flow based on conditions and actionsSome but many are out-of-dateYes, as an app on Android and iOSHuge range of built-in assets, no option to add your own.3DNo, but you can export and open with the Unity engine.   Once published, games can be run within the Unity Play environment online.
Construct 3KS3 KS4Event sheet – conditions and actions   (You can also use TypeScript and JavaScript)Good quality step by step tutorials available to build an entire game. Also features built-in tutorials.  Yes, as a web appCreate or import your own assets – no free built in assets.2DYes  
HTML 5
GDevelopKS3 KS4Event sheet – conditions and actions   (You can also use JavaScript)  Tutorials built into the program itself – short and high quality to showcase different concepts.   Video tutorials available but on YouTube so may be restricted in school.YesRange of free assets available, or create or import your own.2D 3DYes
HTML5, desktop, Android and iOS formats
Godot  KS4 KS5Text based – GDScript, an Object Oriented language, similar to Python  A range of tutorials available on the website.YesFree assets available.2D 3DYes
HTML5, desktop, Android and iOS formats
Comparison table showing various game engines.

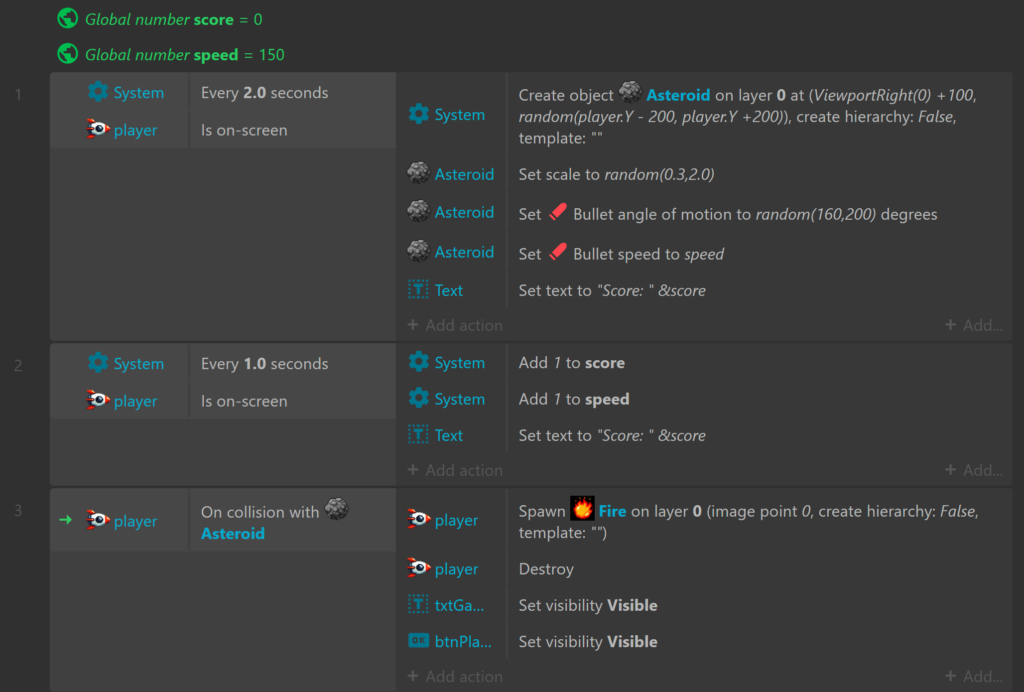
I tried out several of the options listed above by making a simple space game in which you avoid asteroids for as long as possible (my nine-year old came up with the idea and had fun making it with me using MakeCode Arcade!). You can read more about each platform below.

MakeCode Arcade

MakeCode Arcade is a variation of the MakeCode environment you may have seen when programming a micro:bit. The interface uses a block-based language similar to Scratch and therefore offers a very natural progression from Scratch at KS2. It offers a range of built-in assets with drawing tools for children to create their own graphics too. The aim, as the name suggests, is to make arcade style games so the graphics are pixelated resembling the 16 bit games of yesteryear! There is a huge number of built-in, self-paced tutorials to work through to learn how to use the software and games can easily be shared through a school’s VLE like the example below.

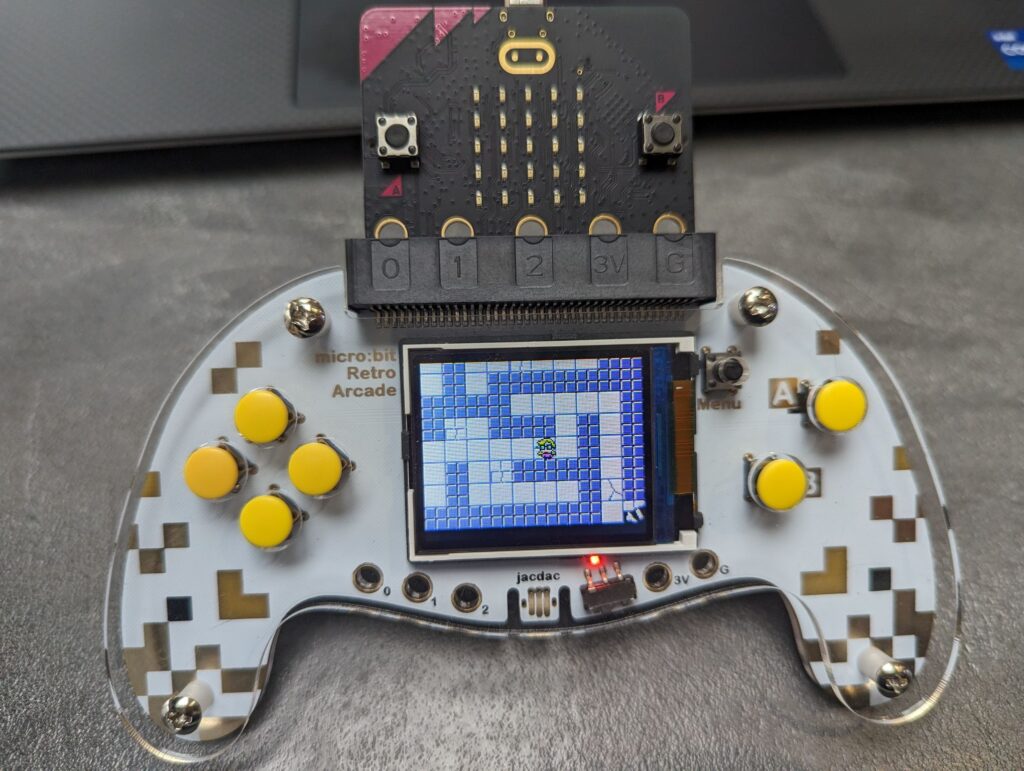
One thing I love about MakeCode arcade is that the games can actually be downloaded and played on a range of handheld gaming devices which the children love doing! I particularly like using Elecfreaks Retro Arcade as the game saves to a micro:bit which then plugs into the handheld device, effectively becoming the game cartridge, this makes it a lot easier for children to share devices and also provides opportunities for designing packaging for the games.

Struckd Studio

Struckd Studio is a 3D game development environment from Unity, I’ve written about this in more detail in a previous post here so won’t go into too much detail again.

The great thing about this platform is that you can build a game with no coding knowledge initially but take it to the next level using the node-based visual coding environment which uses conditions and actions to add functionality, a concept that will be familiar if you are used to using Kodu. Something that makes this stand-out is the huge array of built-in assets available so you can build almost anything you like, whether it’s a medieval dungeon crawler or a futuristic, space-aged alien adventure! There are even driveable vehicles and rideable animals included the list and you can start from a template or a blank canvas. In addition to running in the browser this also can be installed as an app on iOS and Android devices.

Construct 3

I learnt about Construct 3 at the Playful Learning Conference recently and I’ve been hooked ever since. Construct 3 is a 2D game engine that runs in the web browser. After following one of the many in-depth tutorials it was easy to get started, making a simple game. The game environment consists of a layout, which is your level and objects within the game. All objects have properties that you can change as well as behaviours you can add. For example, to get started you simply add a sprite to your layout and assign a movement type (platformer, multi-directional etc.)!

Although, Construct 3 is free there is also a paid version which may be worth considering if you reach the limits of what the free version can offer. The free version is limited to 50 events but so far I have not come close to hitting this limit and when making games in school I can’t see this being an issue at KS3. The other restriction the free version has is it is limited to 2 layers in your level so if you wanted to add some cool parallax effects this could be a limitation but in most cases this won’t be a problem.

Construct 3 allows you to import or create your own assets using the built-in editor. There is an asset store, but at the time of writing there were no free assets available in the store to help you get started, I believe this may be coming in a future release which will be really useful as this was my only niggle with recommending the software as many of the alternatives do have free assets to add directly which is handy from a teaching perspective. Don’t let this put you off, though, I highly recommend taking a look at the excellent free game resources from Kenney to help you get started. You could also use this as an opportunity to introduce AI image generation. All the sprites in my example below were generated by Gemini (mostly because I hadn’t discovered Kenney until after I made the example).

It’s straightforward to get started with coding on Construct 3, an Event Sheet is used to add conditions and actions for the gameplay, it’s simple and logical a bit like Kodu but much more advanced. If you wanted to really push students with their coding skills you can also add JavaScript and TypeScript to the game for additional functionality.

From a teaching perspective when you first load Construct 3 it can look a little overwhelming at first as there are lots of properties and options to tweak but many of these can be ignored initially. I would advise following a tutorial to get started if you’ve never used a game engine before, I started with this one.

If you are looking to introduce objected oriented programming with the use of classes and instances this will also provide a good introduction.

Once you have made a game, with the free version you can export as HTML 5, you could then host this on the school website or external platform such as itch.io or possibly a Google site. Here’s my example, hosted on itch.io:

Finally, Construct 3 has a cloud storage option which links to your Google Drive, OneDrive or Dropbox, depending on what you use in school so students can access their files from anywhere. One thing I noticed is it doesn’t seem to autosave so it’s important to educate your students on the need to save regularly (although this can be turned on in the settings).

GDevelop

GDevelop is a 2D and 3D game engine that is very similar to Construct 3 in many ways. A particularly nice feature is that you can get started with a template rather than starting from scratch which is a nice addition, I also like that you can make 3D games too, although I found the editing view for this a little confusing as the layout editor displays the objects on a 2 dimensional plane which is different to other 3D game engines I’ve used in the past. In school I would probably stick with 2D games initially.

There is a range of built-in tutorials available which go through various techniques in games that have already been created. It would be nice to also have one for creating a  game from scratch as well, similar to the one I used in Construct 3. The main tutorials on their website link to YouTube videos which may be difficult to access in schools, although, when I dug a little deeper I did find some more in their wiki.

The programming aspect is basically the same as Construct 3, add behaviours to objects then using the event sheet to set conditions and actions. Again, you can also add JavaScript programming. Unlike Construct 3, the free version has no limits on the number of events you can use and also appears to have no limit on the number of layers either.

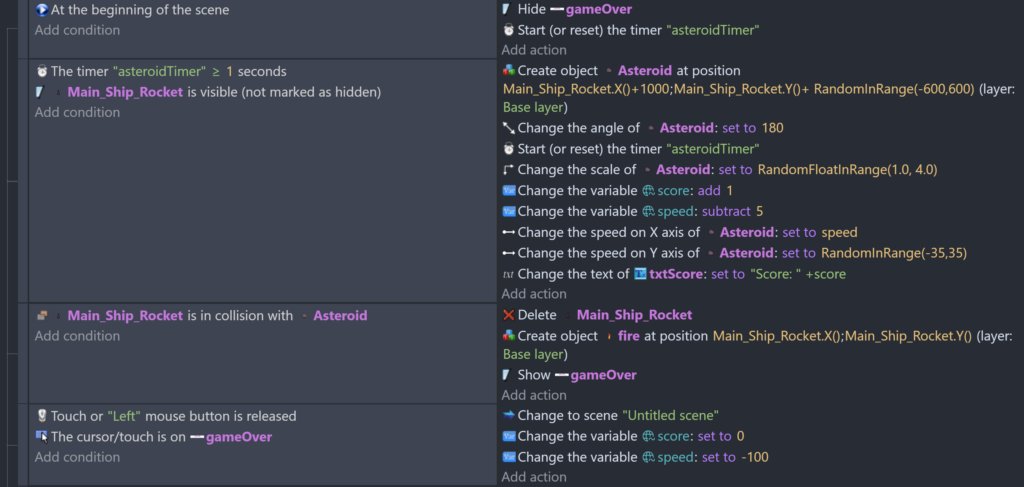
The main limitation with the free version is that it only allows 3 cloud projects to be saved which is a real drawback for me as I would want students to create a range of minigames to cover a variety of techniques. I had a go at making the same space game as I made in Construct and MakeCode Arcade. GDevelop has a range of assets, many of which are free, that can be used in your game straight away which was really helpful when putting together a basic example. I found GDevelop slightly more complicated to use when creating my space game, for example setting events to happen after a given amount of time required creating and setting individual timers rather than just having a condition of “every 2 seconds . . .” Looking through the list of events and behaviours it would appear that GDevelop allows you to add more complicated functionality to games, which is great for budding game developers but not necessarily required from a school perspective. GDevelop also allows you to export to HTML 5, just like Construct 3, but also exports to desktop, Android and iOS (these are paid features in Construct 3). Again, I downloaded as HTML 5 and hosted my game on itch.io:

I really liked both GDevelop and Construct 3; whichever one you choose, you’re going to have a positive game development experience, it was tricky deciding which one to recommend overall but as GDevelop’s free version only allows you to save three cloud projects, I felt this may be problematic in schools and with Construct 3 being slightly easier to use, that helped sway my recommendation.

Godot Engine

Godot is a completely free and open source game engine for developing both 2D and 3D games. It runs in the browser as well as having a desktop application. This sits as an open source alternative to the big names like Unity and Unreal Engine.

As this is a professional-level game engine, it is a lot more complicated for beginners, and students would ideally need an understanding of object oriented programming to get started developing their own games in Godot. If you have students in KS4 and KS5 who want to take their coding skills to the next level and potentially go into game development in the future they should definitely check out Godot. If they have used the platforms mentioned earlier they will be familiar with the interface somewhat in that it follows the same approach of having objects which are added to the scene with properties that can be tweaked. The key difference is with the programming; instead of a general event sheet with conditions and actions, these need to be coded individually per object (node), typically by adding a script to each object to apply actions. From what I have seen in the past, this is generally how advanced game engines work, Roblox Studio, for example is similar. Godot has its own scripting language, GDScript, which is similar to Python. If you’re looking to get started with Godot check out their documentation which takes you step-by-step through making your first games. I haven’t had chance to work through the tutorial myself so haven’t managed to create a Godot version of my space game yet!

I haven’t included any Godot alternatives as they all require installation rather than just running in the browser but I’m hoping to investigate these at a later stage. Let me know if this is something you’d be interested in.

Finally, Some Fun Game Making Activities

I hope you’ve found this post interesting! If you’re planning to get started with creating games in the classroom here are some fun and simple ideas you could try:

  • Asteroid dodging (like my example above)
  • Fishy
  • Flappy bird
  • A simple Mario-style platform level (collect objects, avoid enemies, reach the flag)
  • Any retro arcade games such as Breakout, Pacman or Pong

Some tried and tested methods for teaching coding that you’re probably familiar with are PRIMM and Parson’s Code, which are both great ways to get children creating their games quickly with a smaller learning curve:

PRIMM

  • PREDICT – Look at some of the code or an event sheet for a game and predict what they think will happen
  • RUN – Run the game to see if their predictions are correct
  • INVESTIGATE – Discuss, annotate and explore the code or event sheet
  • MODIFY – Change the behaviour of parts of the game and/or add some additional functionality
  • MAKE – Use the skills learnt to create their own game

Parson’s Code

Give learners the code blocks needed for a simple game but not joined together, this would be easier to implement with MakeCode or Scratch

Playful Computing Conference

      No Comments on Playful Computing Conference

I recently had the pleasure of attending the Playful Computing Conference from Digital Schoolhouse. It’s been a while since I attended a conference as a delegate so was very excited for an fun-packed day of learning!

The day kicked-off with an inspiring keynote by Shahneila Saeed from Digital Schoolhouse highlighting the importance of play, following this Estelle Ashman got the whole room up playing a cat and mouse game together around the auditorium! It was great fun and demonstrated an entertaining activity to run with students in which they unpick the rules of the game as well as adding new rules; a lovely introduction to discussions on game design principles which enable players to unpick:

  • The game character
  • Game mechanics – rules to play the game
  • Protagonist/antagonist – hero and villain
  • End game state – how does the game end?
  • Who wins? – how does the player win?
  • Iterative design – playing again and adding more features

I wish I had seen this example15 years ago before I started teaching game development in schools as it’s definitely something I would add now. Next time I deliver a gaming workshop, I’ll definitely be including something similar.

The day ahead offered a wide range of sessions to choose from, in fact so many, I struggled to choose! The ones I opted for in the end were:

  • Session 1 – Climate Schools Programme by Engineering UK
  • Session 2 – Eco Gamer by Estelle Ashman
  • Session 3 – Using Unreal Engine in the Classroom by James Butcher
  • Session 4 – Flock XR by Flip Computing
  • Session 5 – Learning on Roblox by Tim Scott

Climate Schools Programme by Engineering UK

In this session I learnt that Engineering UK has a range of free resources for schools to download and use to enable them to teach climate related projects on school, the good thing about these resources are that they are aligned to the National Curriculum and range across various subjects, such as geography, maths, science and English. They are currently still developing computing resources in this area.

We were also pointed towards a useful app, Neso, which allows you to look up the current carbon free energy usage across the UK, it was surprising to learn that during the session, the UK was as high as 78%!

Something I particularly liked was the highlighting of careers within their resources so students get an idea of where the skills and projects are leading.

Eco Gamer by Estelle Ashman

Similar to the previous session, one of the first points highlighted careers in the game industry with a One Minute Mentor video to highlight a tech career – the example we were shown was an interview with Natalie Cooke who is Operations Director at SEGA. It was really interesting to hear about a role directly from somebody in the industry, you can check out the full range of One Minute Mentor videos here. These are a really useful tool for highlighting key careers to students, without being too long or in-depth.

Following this we were led through a practical Game Jam task which was inspired by the Mobo Game Jam. We were given the brief to:

Develop a short game or game idea that promotes clean air and helps players to understand the importance of taking positive action against climate change.

As a team, our table worked together to generate initial game ideas before coming up with our brand identity ready to design some eco-friendly packaging. I really liked how we were taken through the steps of the game jam as learners rather than just being told about how it worked! We were also introduced to Construct 3 as a tool for creating games, which looks really interesting (I’ll save that for a later blog post!) I honestly could have happily spent the rest of the day, planning and developing our game! I’ve done game and app jams/workshops in the past in school and always loved how much could be achieved when having a whole day to work on a project compared to spreading it out across multiple lessons! Here’s a link to a previous post about a girls’ game day I put together many years ago and a Koduthon at Microsoft HQ.

Digital Schoolhouse provide loads of free resources on their website to help you get started, including recipe cards to carry out various activities within Construct3.

Using Unreal Engine in the Classroom by James Butcher

The main focus of this session was the educational use of Fortnite, which I was really happy about as I have not really explored Fortnite before and hadn’t realised the extent of its educational merit, until now!

I love gaming and it was interesting to see some recent statistics (albeit American) that 46% of players are female which is much more balanced than it used to be. The study also showed that 65% of Americans play video games at least once a week. I’m going to dive into some more statistics myself in my next blog post.

This session was really interesting as I learnt there are two creative aspects to Fortnite in addition to the standard, Battle Royale game itself. Firstly, available for anyone who has the game (which is free) is a creative mode where you can create your own island and build it up to look however you like, I showed this to my nine year old son after the conference and he loved building his own little world. In addition to this, you can then use Unreal Editor for Fortnite to edit this world and create your own mini games within the Fortnite eco system. Fortnite is no longer just a standalone game but a whole platform for developing and publishing your own games. I’ve since explored this at home and it would be really easy to take you down a rabbit-hole at this point but I think it may deserve its own blog post at a later date! Of course, I had to have a go at the standard game and eventually, after three tries, I managed to be the last person standing! (A new level of Mummy-respect was earnt!)

Epic Games have also developed a range of educational resources for using Fortnite in the classroom and there’s even content relating to the UN SDG goals and a specific Lego Fortnite Playbook called Coding for Climate.

Additionally, we were introduced to Reality Scan, a mobile app for scanning objects in 3D, I’ve had a quick play with this and it looks really good, it’s also free! With this, I believe you could scan objects and add them into Unreal Editor for Fortnite so they can exist in your virtual island! I’ve yet to try this though.

The final tool James shared was Metahuman, another free tool, in which you can create life-like digital humans for use in games and animations. I haven’t had chance to fully explore this yet but it looks very cool!

Flock XR by Flip Computing

The next session I attended was a hands-on session, in which we were able to try out new online software by Flip Computing, called Flock XR. This is a lovely visual coding environment, in which you can create your own 3D animations and games. Aimed at primary children, the environment is similar to Scratch except the world is 3D. I was very impressed at how easy it is to get started and I believe more features will be added soon, as some of the functionality is still in development. I’m very impressed with what I have seen so far and was able to make a fun little dancing character with some special effects included too!

Flip Learning have provided free teaching materials to help you get started. You can give Flock XR a try here.

Learning on Roblox by Tim Scott

The final session of the day was all about Roblox by Tim Scott. He began by highlighting the huge range of learning games on Roblox, you can find the full list here. There will be some BBC Bitesize resources added to this soon as well.

Some of the key experiences from the list above, Tim highlighted were:

  • Lua Learning – A game where you can learn to code
  • Revive Atlantis – learn about cyber security
  • Mission Mars – Scientifically accurate Mars exploration
  • Be Internet Awesome – Learn about online safety
  • AVID Creator Planet – An educational adventure on a futuristic planet

Next Tim showed us a demo of Roblox Studio. I’ve explored this in the past to develop my own mini-game and it was interesting to see Tim showcase the AI features within the platform, giving it instructions to write key parts of the code for you, a great feature to allow educators an opportunity to showcase AI in an interesting way.

Tim finished by addressing safety concerns within Roblox, this is something that has made news headlines in the past. It was good to hear that, as a company, they have lots of measures in place to keep children safe. They use a mixture of AI moderation at the first stage followed by moderation by large teams of experts across different fields to ensure very little slips through the net. As with any platform, there is some responsibility on the parents to ensure they know what their children are doing online (and they haven’t lied about their age!). Parents can control what types of games their children are exposed to as well as set limits to ensure they can only send messages to friends (or turn messaging off completely). I found this quite reassuring, as a parent, I was wary of Roblox at first due to the bad press it had received but my children have not had any issues so far with the platform, we’ve had many open conversations about Internet safety and strangers online too, and having Roblox has provided an opportunity for those conversations. They’ve played some interesting games too, recently cultivating their own virtual gardens!

The event finished with some celebrations and a networking opportunity but I had to leave to catch a train home so missed out on that but I’m definitely hoping to return next year and will plan for a later train!

The Current Robot Projects

      No Comments on The Current Robot Projects

If you follow me on social media you may have noticed that I have a few robotics projects on the go at the moment! I’ve always loved robots and living in an age where electronic components to build or customise your own robots is so accessible is something I find amazing! Child-Me would have loved to have all of this tech at her disposal! I’ve decided to write about the robots’ progress here and share some of their code as I go along as a way of documenting the projects!

So, let me in introduce you to the robot team . . .

Omnibot

I bought Omnibot, a toy robot from Tomy that came out in the mid-eighties, second-hand from eBay with the intention to customise him over the summer with up-to-date electronics. It took me a little longer than expected, but this has been a really fun project to work on and has given me a good understanding of programming on a Raspberry Pi Pico, along with the differences between MicroPython and Circuit Python. The first things I upgraded were Omnibot’s eyes which are now LED arrays  in the form of Adafruit LED backpacks.

Omnibot uses the original motors to move around and also has a Pico inside the original remote to control the robot. The two picos communicate using Bluetooth to send and receive movement commands. I was really pleased that I managed to finish Omnibot by Christmas, just in time to pass around the chocolates:

Although Omnibot is technically complete, there is more functionality that I would like to include and I’ve reached the limit of what I can achieve using a Pico so this project is set to continue! For my birthday this year I received a Raspberry Pi Zero, camera and power supply so I’m currently working on giving Omnibot a brain upgrade, introducing some AI capabilities with the camera and giving him a voice too. So watch this space for further updates!

You can check out the current Pico code for Omnibot on Github.

Ferdinand the Furby

Ferdinand was another eBay purchase. The idea behind him was to give him a real voice, discussing this with my children, who helped to take the furby apart, we decided we wanted him to sound like a posh butler and we renamed him Ferdinand. We threw in a bit of random speech too about world domination, just for fun!

Ferdinand has, so far been programmed with a micro:bit as I wanted the code to be understood by the children, it works well except the micro:bit and breakout board to power the motor are too big to fit back inside the body! The next steps are to switch over to a Raspberry Pi Pico for the brain instead.

Here’s Ferdinand in action:

You can view the code in MakeCode for the project so far, here.

Pico-Bot

Pico-Bot is the first robot that I’ve designed and started building completely from Scratch, using 3D modelling and printing to create the body and hold everything together. Pico-Bot will eventually look like the cartoon robot at the top of the page! One of my stocking fillers at Christmas was a Pimoroni display for Pico, I made a little face appear which gave me the idea to turn it into a little robot. I’ve since added a Pimoroni Pico Omnibus which enables me to use the screen, alongside a Motor Shim to power the wheels. It’s still a work in progress but I’m also working on 3D printing the body of the robot, a surround for the screen, and somewhere to store the batteries, of course!

R2D2

The only finished project in the list (although I may still make some improvements) is R2D2. I had the inspiration to make R2D2 at work when I was about to throw away a Coffee Mate tub and realised that combined with a domed smoothie lid it would make a great R2D2! The parts subsequently sat in my maker space for months until Star Wars Day, which reminded me of the project, once again! R2D2 is powered by a micro:bit in a Wukong breakout board by Elecfreaks and also makes use of their mp3 module. I was going to mount him onto a CuteBot so he would be remote-controlled but I ran out of time so maybe that will be a fun extension for May 4th 2026!

You can view the MakeCode for R2D2 here.

R2D2 is similar, in functionality, to the robots we make in school workshops when we deliver our Robot Petting Zoo or Scrap:bot Creator sessions. If you would like to find out more about school workshops click here to visit the U Can Too site.

I hope you liked meeting the robots! I’m sure I’ll be posting again soon with updates on their latest brain upgrades. Follow me on BlueSky to keep up-to-date!

An Intro to Struckd Studio

      No Comments on An Intro to Struckd Studio

Have you heard about Struckd Studio? It’s a fairly new and super engaging way to build your own 3D video games. As you may know, I’m a huge fan of making games as a way of getting children into coding. My all-time favourite being Kodu Game Lab for which I have a scheme of work and teaching resources for using in the classroom.

Recently I stumbled across Struckd Studio as I was interested in learning how to use Unity and discovered this as an easy entry-point through their very comprehensive (and free) tutorials.

In addition to being an educator, I’m also a parent to two young children who love building games so I was really excited to see this is available, both in the browser and as an app on Android and iOS; my 9yo, in particular, loves using various game-making platforms (such as Kodu, Super Mario Maker and Ultimate Level Builder) so he was particularly keen to try out Struckd Studio on his tablet and has had great fun making a zombie apocalypse game as you can see below!

Screenshot of my 9yo son's zombie apocalypse game.
Screenshot of my 9yo son’s zombie apocalypse game.

The great thing about this platform is that you can build a game with no coding knowledge initially but take it to the next level using the node-based visual coding environment which uses conditions and actions to add functionality, a concept that will be familiar if you are used to using Kodu. In the example below he has added an end sequence to his game based on the number of points achieved (gained by destroying zombies):

Unity script shown in Struckd Studio (also know as Muse Behaviour in the mobile version)

Wide Range of Assets

As you can see, something that makes this stand-out is the huge array of built-in assets available so you can build almost anything you like, whether it’s a medieval dungeon crawler or a futuristic, space-aged alien adventure! There are even driveable vehicles and rideable animals included the list!

Screenshot showing some of the assets available in Struckd Studio

I love the idea of taking this into schools in my role at U Can Too within one of our tech workshops and letting children’s imaginations run wild, whether they are focused on developing their own game or a simple immersive world to tell a story, it’s all easily achievable in Struckd Studio.

As this runs within the web browser it makes it ideal to use in school as no software needs to be installed unless you would prefer to run it on an iPad of course!

Getting Started

To get started with Struckd Studio visit https://play.unity.com/en/studio or download one of the mobile apps.

You can either begin by creating a Blank Project or by looking through the range of template worlds to get a feel for things.

If you’re using the app on a mobile device you’ll need to go to the ‘Create’ tab at the bottom. The bonus with the mobile app is there is a tutorials section to help you get started.

In both versions, there’s a Tools menu to help you set the style of the game, edit the terrain and manage the game settings. You’ll then be ready to explore and add a range of assets from the options. These are at the bottom of the screen on the browser version or you can access them using the + icon on the mobile version. Once you’ve added a character to play as, you will notice that there’s a range of settings to look through and tweak. Once you’re happy, hit the ‘Play’ button and try out your new creation!

Screenshot of Struckd Studio running in the web browser.

I love that you can choose cute, cartoony looking characters like the example above as well as more realistic options!

If you need some more guidance in getting started there is a handy guide on the Struckd website that talks you through each of the tools available: and another guide on how to use the node based coding interface to modify the game behaviour

Struckd Verdict!

This is definitely one of the best game-creation tools I’ve seen for instantly getting children creating and using their imagination without a steep learning curve. I like that coding is optional, although from a computing perspective it is not necessarily going to cover all the assessment criteria that is required (if that’s what you’re after I’d recommend Kodu or MakeCode Arcade), however for a more cross-curricular experience, like building terrain or an immersive virtual world from the perspective of story-telling it is excellent and would make a great addition to  a game making club. For hard-core, budding game developers who may be yearning for more they can even export their game into Unity’s game engine and explore the range of tutorials to start making their very own standalone game!

Okido Magazine Review

      No Comments on Okido Magazine Review

I’ve recently been on a hunt to find a good STEM-related magazine for my young children (aged 3 and 5). I’m not keen on the plastic toys that come attached to the front of many children’s magazines and I wanted something that was both entertaining and had some educational value. On my search I stumbled across Okido, branded as an Arts and Science Magazine for Kids, aimed at children aged 3 to 7. I reached out to the team and they kindly sent me a free copy to review. This has not been a quick process as the magazine is so jam-packed with content, myself and young children have been regularly revisiting the various sections since we received our copy a few weeks ago. We have issue #98, titled Friends which is themed around friendship and returning to school.

The magazine is 47 pages long and made from thick matt paper which, in addition to being environmentally friendly, is particularly useful for colouring and writing on the activity pages; too often magazines have a sheen to them meaning pencils don’t show up well and pens rub straight off! Another little feature which I like is that pages with cut-out sections have nothing on the back to ruin so you can freely cut out the activities without losing valuable magazine content. Additionally with the pages being printed on good-quality, thick paper, the cut-out activities stand up well to the handling of small children! In fact our chatterbox and puppets are still in pretty good condition weeks later!

Overall, I was very impressed with the content; there was a large variety of things to read and do, including comic strips, stories and a poem. All of which were enjoyed by both boys. They also really enjoyed all of the activities to complete, these involved drawing, writing, navigating a maze and maths challenges. They both particularly liked the search and find pictures too, one involved finding and colouring monsters and the other was more like a Where’s Wally exercise to find Foxy and friends as well as a variety of other quirky characters within the picture. To my surprise my three-year-old also really enjoyed the writing exercise showing lots of concentration to trace over all of the words.

My three-year-old also loved the addition of the Pizza Swirls recipe, which was very accessible and simple for young children (as well as being delicious and perfect for our guests during an afternoon playdate!) I believe there is a recipe featured in each magazine so I’m quite intrigued to see what will be in our next edition.

The board game was a nice feature too; we all enjoyed playing it and using a variety of different objects as counters! I think the 1990s Mini-Boglins and Monsters-in-my-Pocket were our favourites!

Amongst the other content, my oldest son particularly enjoyed making stick puppets which were based around school children, he liked equipping their bags with various pieces of school stationery and writing in their miniature exercise books.

The only drawback for me was that the issue I was reviewing didn’t have a lot of content in relation to the science and technology aspect of STEM learning but having looked through the back-catalogue on their website it seems that’s unusual so I wasn’t put-off by this, in fact I will be subscribing shortly and looking forward to receiving our next issue.

If you would like to subscribe too you can enjoy 15% off using the code: SOCIAL15. Click here to order online directly from the Okido website.